Creating Issuers & Repositories
💡 Background
If you are unsure what Issuers and Repositories are or how they relate, check out the Documentation Library page for a full explanation.
Creating An Issuer
Since Issuers are a top-level, “set-and-forget” concept, the ability to create and delete Issuers is restricted to Admin Users, and can be found on the Admin page under the Issuers tab.
Creating an Issuer is straightforward: use the ADD ISSUER button. To delete an existing Issuer, click the three vertical dots next to it.
⚠️ Proceed With Caution!
Deleting an Issuer will also delete all associated Repositories, Documents and Specifications and is pretty much irreversible. Please be careful!
Managing Issuer Editors
Once an Issuer has been created, it is possible to define the set of users who are allowed to edit documentation associated with it.
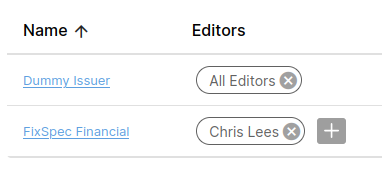
Setting this to All Editors allows anybody with a documentation editor role to edit any documentation associated with the Issuer. Alternatively, you may explicitly list which users are permitted to edit.
💡 New joiner can't edit a spec?
This is the first place to check. Editor role alone isn’t enough — they also need to be on the allowed list for the relevant Issuer (unless it’s set to All Editors).
Creating A Repository
Within the platform, a Repository is a grouping of API documents by Issuer and Protocol. It follows that each Issuer has a set of known Protocols associated with it, which are added and removed on the Issuers tab within the Admin page.
Repositories do a lot of work under the hood, but creating one is deceptively simple: just add the new Protocol to the Issuer, and the platform builds the Repository for you in the background.