Conformance Scenarios
⚠️ Certification Approvers Only
Note that the ability to create or edit capabilities or scenarios is restricted to users identified as certification approvers.
This page assumes a good understanding of the conformance hierarchy.
Creating Capabilities
To get started, go to the “Scenarios” tab in the top navigation, and select the Service (title and version) from the drop-downs.

ℹ️ Info
Don’t see the one you need? Make sure the document exists, and there’s a service pointing to it.
Now you can define a new capability using the drop-down menu, or either of the links on the page, and fill out the modal that appears.
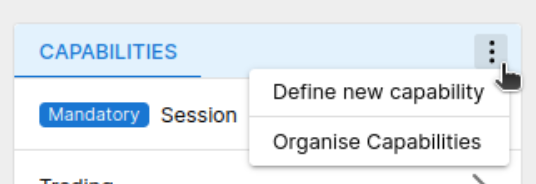
💡 Mandatory Capabilities
You will be asked whether a capability is mandatory or not. Mandatory capabilities are automatically added to the scope of all new onboard certifications (but optional for existing client upgrades). Session Layer is a common mandatory capability.
Once created, you can edit any details of a Capability by selecting the capability (to view it) and clicking the three vertical dots in the top-right corner.
Creating Scenarios
To add a new Scenario, start by selecting the Capability it should sit within, and look for the “Add Scenario” button.
Enter the basic information for the Scenario in the modal which appears.
- Reference is a unique (short) code for your scenario. You can use numbers if you like (e.g. ORDER_TEST_001), but note that it has no bearing on display order.
💡 Core Scenarios
Just as Capabilities can be “Mandatory”, Scenarios can be marked as “Core”. This marker is used to differentiate between scenarios which must - in 100% of cases - be observed when a customer is demonstrating a capability, versus those which are optional within a capability.
When we look at certifications, you will see the ability to mark a scenario as skipped; core scenarios can not be marked as skipped.
Once the scenario is created, the page will automatically move to it, ready for you to add individual steps. Click the link or button to append a new step to the end of the sequence.
When defining an automated step, you will be invited to specify the message (or functional view) that you need to observe, and its direction:
Inboundis for messages received from the customer into your platform,Outboundis for messages sent from your platform out to the customer, or- Select
Either Direction.
You may then add further, field-level conditions using the condition builder which appears. This dynamic component is fed directly from the specification; the list of fields is populated automatically, the set of operands is appropriate to the selected field’s datatype, and values may either be a selection of enumerations or a free-text field.
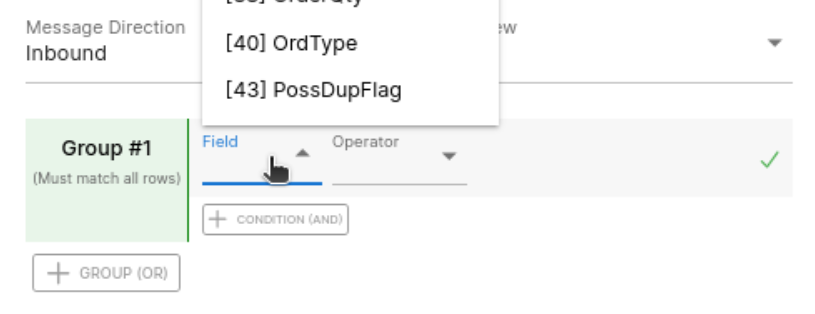
The condition builder can be used to build complex conditions, including the ability to handle “OR” conditions between alternative groups of statements and the ability to accept a missing field as a valid condition. On the second (and subsequent) steps, you are also able to require that a field’s value equals a field in a previous step.
IMPORTANT: You should NOT need to add explicit field link references (“chains”) which are well-known in FIX, as the platform has this intelligence baked in. For example, if your scenario requires an order to be entered in step 1 and amended in step 2, then you do not (should not) specify that 41 in step 2 should equal tag 11 in step 1 - this is automatically applied.
But what if you have scenarios which test a customer’s ability to enter two independent messages which are normally chained (e.g. enter an order and then hit it with a second order)? This is what Message Chains in the Advanced tab controls; differentiate chains by marking them with different Link references.
ℹ️ Handling Custom "Chaining"
Have custom chaining logic or fields? No problem, it’s soft-coded into configuration. Just drop us a line.
ℹ️ Info
Since manual steps are designed with manual review/sign-off in mind, they may only be placed at the end of the step sequence, with no automated steps after them.
Organising Capabilities & Scenarios
💡 Tip
When migrating customers into our platform, we often find existing scenario references which contain an ordering number. You are free to keep those references of course, but display order is uniquely controlled by the functionality described here.
Capabilities and scenarios can be reordered by selecting Organise Capabilities from the capabilities menu in the left-hand navigation panel, which controls both types using the toggle at the top.
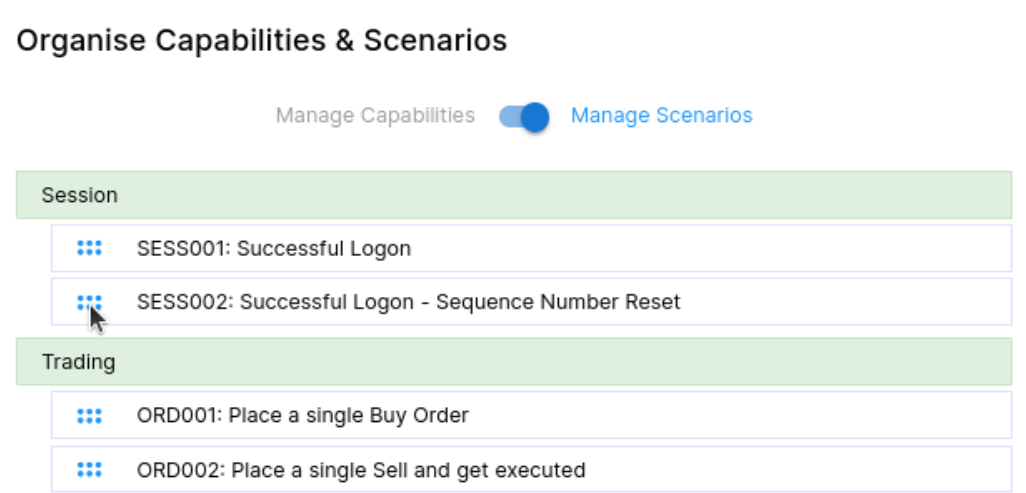
Simply drag rows using the gripper dots as needed and click Save when you are done.
Frequently Asked Questions
No. Our platform is designed to clearly segregate data collection from scenario definition. This means that when you change a scenario definition, conformance results are immediately updated without the customer needing to re-test.
This is - admittedly - a double-edged sword. While it’s great for fixing internal mistakes without disturbing the client, it can lead to unexpected changes to customer conformance results without good internal discipline.
Theoretically, as many as you like, although we’d strongly discourage very long, convoluted scenarios; they’re computationally slow and brittle, but worst of all, customers find them confusing and hard to pass. Short scenarios with 2 to 4 steps are ideal.
We advise against being overly prescriptive in scenarios — focus on exactly what you need testers to demonstrate. If you want them to show limit order entry but don’t care about the symbol, side or price, don’t specify them; our software will find the evidence regardless, and it’s less work for your customers.
No — we automatically clone all of your capabilities and scenarios when we clone your document, ready for you to edit and extend as needed. Just make sure you’re editing the right version!
No, all common FIX chaining references (e.g. ClOrdID (11) becomes OrigClOrdId (41) on an order amend) are automatically applied. Specifying them in your steps won’t change the result, but may slow performance.